Non-Contact temperature measurement glass industry
Environmental influences
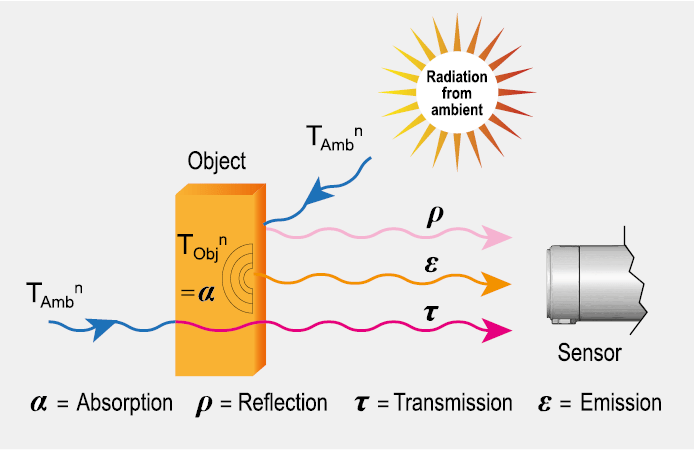
The illustration shows that the transmissivity of air strongly depends on the wavelength. Strong attenuation alternates with areas of high transmissivity – the so-called atmospheric windows. The transmissivity in the longwave atmospheric window (8 – 14 µm) is constantly high whereas there are measurable alleviations by the atmosphere in the shortwave area, which may lead to false results. Typical measuring windows are 1.1 … 1.7 µm, 2 … 2.5 µm and 3 … 5 µm. Additional influences can arise from heat sources in the environment of the measuring object. To prevent wrong measuring results due to increased ambient temperatures, an ambient temperature compensation can already be set in the infrared measuring device. This is especially helpful when measuring objects in closed chambers where the walls are hotter than the measuring object. Best results are achieved by using a second temperature sensor for measuring the
ambient temperature inside the chamber. This value is then used for correcting the IR temperature measurement.
Further applications
Emissivity and temperature measurement
For the accurate measurement of temperatures, emissivity is a key factor. It is dependent on various influences and must be adjusted according to the application. Emissivity theoretically depends on the material, its surface quality, wavelength, the measuring angle and, in some cases, even the applied measuring configuration. Uncoated glass usually exhibits an emissivity of 0.85 in the longwave range (8 – 14 μm). In processes with higher temperatures glass surfaces are measured with 5.0 μm or 7.9 μm because in those spectral ranges the emissivity is ≥0.95. The main advantage of 7.9 µm is the lower angle dependency of the glass surface reflection in this wavelength range. This means that the surface temperature can be measured independently of the reflection even at an inclined viewing angle.


Dust, smoke and particles in the atmosphere can pollute the optics and result in false measuring data. Here air purge collars (which are installed in front of the optics with compressed air) help to prevent deposition of suspended matter in front of the optics. Accessories for air and water cooling support the use of infrared thermometers even in hazardous surroundings.
Temperature measurement of glass
If you measure temperatures of glass with IR thermometers or the special IR camera optris PI G7 it implies that you take care of reflection and transmissivity. A careful selection of the wavelength facilitates measurements of the glass surface as well as of the deeper layers of the glass. Wavelengths of 1.0 µm, 2.2 µm or 3.9 µm are appropriate for measuring deeper layers whereas 5 µm are recommended for surface measurements. If temperatures are low, you should use wavelengths between 8 and 14 µm in combination with an emissivity of 0.85 in order to compensate reflection.
Line scan with compact infrared camera
Optris infrared cameras are delivered with licensefree PIX Connect software. The software enables the cameras to operate as line scan cameras. Line scanners are traditionally used in the glass industry for various measurement procedures. In these devices, a point detector is coupled with a rotating mirror to consequently generate a linear optical scan of the object. These devices are bulky and expensive. Additionally, a high manual effort is required for setup. When using an infrared camera as a line scanner, an arbitrary line is selected from the detector array. In addition to the more compact construction and the lower price, there are two significant benefits: the line to be scanned can be positioned and dimensioned anywhere using the software and the user receives a complete IR image effectively as additional information – these are important advantages, especially during system setup. The cameras can accurately measure surface temperatures of moving measurement objects using minimal apertures. This function is of particular significance in the glass industry, since the glass temperature has a direct impact on the quality. Accordingly, temperatures are recorded at many points during the production process and transmitted directly to the process control system. For example, the optris PI 640 G7, a special IR camera for glass applications, can scan the complete glass width using in the float process (Up to 4 m) with an 90° lens using the diagonals as scan line at a height of 1.7 m. Using a subframe mode of 640 x 120 pixels and the same optics, data can even be captured with 125 Hz creating to a thermal image in any resolution.

Further support and information
Production optimization in the float glass process
After the tin bath, the flat glass band has a temperature of about 600 °C; the first infrared camera in line scan mode is applied for temperature monitoring at the transition to the cooling zone. The glass is transported through different cooling sections where at several points infrared cameras are installed to observe the whole process and to ensure an optimal quality.

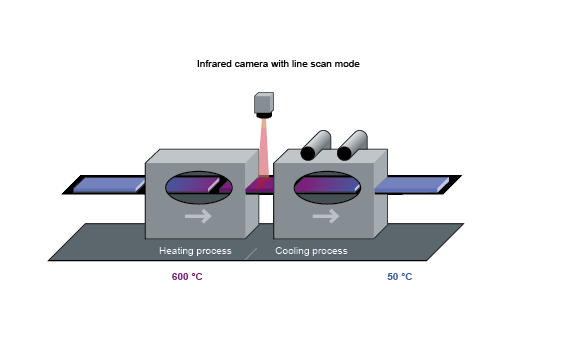
Single-pane safety glass production with correct temperature measurement technology
For the production of single-pane safety glass (SPSG), the cut and processed flat glass is heated in a furnace under continuous movement at over 600 °C. During the transport of the heated glass in the pretension zone, an infrared camera monitors the temperature distribution on the glass surface in line scan mode.
Inhomogeneities can thus be compensated during the tempering process, in which the glass is air-cooled. The quality of the SPSG mainly depends on a homogeneous thermal treatment, which is ensured by the application of the correct temperature measurement technology.
Ensuring the quality of laminated safety glass
Laminated safety glass (LSG) consists of at least two flat panes of glass, which are laminated in a clean room with a sheet of PVB film between them. The temperature of the film can be monitored with infrared thermometers. In the pre-heating furnace, the glass panes are heated in order to melt the film and simultaneously press the “sandwich” together, to prevent air pockets. During the transition to the autoclaves, the temperature distribution is monitored with an infrared camera, in order to adjust the heating elements in the pre-lamination furnace for subsequent panes, when necessary.

Continuous control during the production of container glass
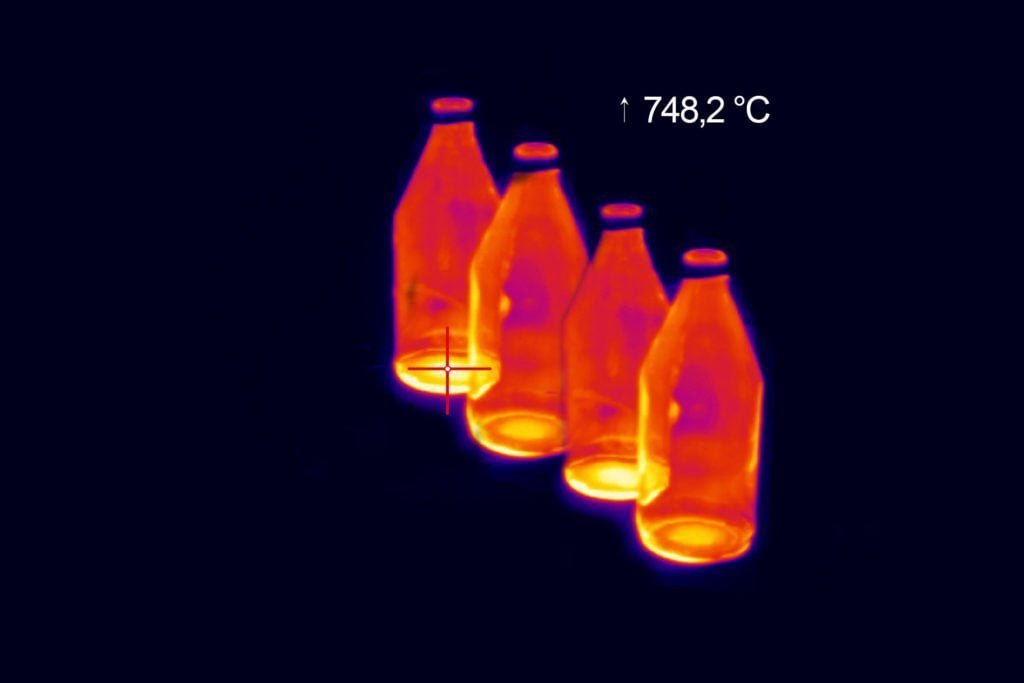
Container glass, meaning for example bottles in all size and shapes, must be repeatedly monitored for its processrelevant temperature during the production process. When the molten glass exits through the feeder, the glass strand is cut. The thereby resulting molten glass gobs must have a temperature of about 1000 °C to ensure quality. Infrared thermometers and cameras with a short wavelength
spectral response of 1 µm enable to measure the core temperature of the gob. With the innovative optris PI 1M a simultaneous measurement of multiple areas like three gobs in one image is possible.

During the forming process, which takes place at temperatures of over 500 °C, infrared sensors are also used for monitoring. Since the process only takes a few seconds, the reaction of the sensors is of critical importance here. The thermal measurement of the glass can be influenced by direct measurement of the glass surface or indirect measurement of the surface of the forming tool for both the forming of the parison shape as well as during finishing of the mold.
To complete the finishing process, another temperature control to reduce tension
takes place in the containers. The glass is heated again and subsequently graduall
cooled in a cooling tunnel over a period of up to 30 minutes. When the containers exit the heating zone, the cooling process is supported and controlled by temperature measurement.

Solutions for low-E glass tempering
All kinds of glass, coated and uncoated, change their emissivity behavior in dependency of the angle of view. Especially low-E coatings show an unusual behavior. For a reliable and reproducible temperature measurement a referencing from underneath (uncoated glass surface) is necessary.
Features
- Top down system with additional reference pyrometer from underneath for automatic emissivity correction
- Digitally controlled lens protection system (DCLP) avoids extra air purging
- Glass area calculation
- Pre-assembled system for easy installation as retrofit on glass tempering furnaces
- Automatic scan line adjustment – insensitive to distortions
Industry-specific measuring instruments
Special wavelength rangers
The IR thermometer’s stainless steel measuring head is extremely small and can be employed in ambient temperatures of up to 85 °C without additional cooling. The temperature range is from 100 °C to 1650 °C.
The infrared thermometer optris CTlaser G5 allows the temperature measurement of smallest objects of 1 mm from a distance of 70 mm. Due to its very short response time of 10 ms it is often used for fast processes.
The infrared thermometer optris CSlaser G5HF has been specifically designed for temperature measurement of glass. Its standardized two-wire interface provides a reliable measuring data transmission and allows for an easy integration of the temperature sensors into a PLC. The IR thermometer is additionally equipped with an innovative double laser visor for a precise marking of the measuring spot. A variety of optics ensures high adaptability with diverse applications.
The infrared thermometer optris CTlaser 1M / 2M offers a special measuring wavelength and allows precise and quick measurement of temperatures from 200 °C up to 1650 °C.
The infrared thermometer optris CTlaser G7 is perfectly suited for precise temperature measurement of ultra-thin glass surfaces. It offers a broad temperature range from 100 °C up to 1200 °C and can be employed in temperatures of up to 85°C without additional cooling.
The infrared cameras optris PI 450i G7 and PI 640 G7 are the first industry-specific models within the
PI series. Especially developed for the glass industry, they have a specific spectral response of 7.9 µm.
The temperature range of 150 °C up to 1500 °C allows the implementation in diverse applications in
production, refining and further processing of glass panes, glass bottles and other glass products.


optris CT G5
Due to its special spectral range of 5.0 µm, the pyrometer optris CT G5 is perfectly suited for the measurement of glass temperatures, e.g. during container glass production and vehicle glass production.
optris CTlaser G5
With a spectral range of 5.0 µm, the two-part infrared thermometer optris CTlaser G5 is especially designed
in precise measurement of glass surfaces. The devices are deployed for temperature measurement in e.g. manufacturing processes of vehicle glass and flat glass.
optris CSlaser G5HF
The IR thermometer is perfectly suited for temperature control of production processes of flat glass and vehicle glass. Also, the measurement during cooling and heating processes of single-pane safety glass and laminated sheets safety glass is important.
optris CTlaser 1M / 2M
The spectral response of 1.0 µm or 1.6 µm makes the CTlaser 1M / 2M ideal to measure deeper layers of glass. It is perfectly suited to measure temperature of
glass in the melting furnace or the gob temperature in container glass production lines.
optris CTlaser G7
Due to its spectral region of 7.9 µm the two-part IR thermometer optris CTlaser G7 is optimally suited for accurate temperature measurement during the production of ultra-thin glass used for touch displays of smartphones, tablets etc..
optris PI 450i G7 / PI 640 G7
These infrared cameras should be used when temperature values within a field are to be detected. The IR imager is used as a line scan camera in the field of sheet glass production and offers various possibilities for documenting and controlling the process. Due to the low price an infrared camera could be the better solution in comparison to many single infrared thermometers.
Air purge for rugged environments
The air purge unit complements the reliable CoolingJacket Advanced (water cooling housing) for use in harsh environments. The system can be used at ambient temperatures of up to 315 °C. An integrated, infrared-transmittive special window protects the optics of the camera or sensor on the one hand and, on the other hand, enables an optimal laminar air flow. The air purge design has been optimized by extensive tests in the Optris in-house test laboratory. Practically the turbulence-free laminar air streaming leads to longer maintenance intervals.

Variety of options
Two models of the Optris air purge are available:
• Large sighting window For applications in need of the infrared camera’s whole detection field.
• Inspection slit For applications using only a scan line, thus offering an even better protection of the sensor. This option is quite common in the glass industry.


Installation and maintenance-friendly inspection clap
The focus of the installed infrared camera can be adjusted from the outside through the gear ring without changing the position of the camera. The cost- and license-free software allows for an uncomplicated parameterization, for example the definition of the scan line, from the computer. The installation effort at the customer site is thus reduced to a minimum. The folding mechanism of the air purge enables the inspection of the protective window and the camera optics without disassembly. The manual focus through the integrated ring remains unchanged.
Flexible air purge for the protection from dirt
In harsh environments, the airflow in front of the CoolingJacket Advanced has proven to be just as critical for reliable and accurate temperature measurement as the cooling itself. The air purge unit optimizes this airflow and allows both orthogonal (left) and parallel (right) airflow.

For harsh environments...
To protect the optics of the camera, an optional shutter (closing mechanism) can be purchased. It is equipped with a servomotor that can open and close a mechanical lock as needed. The special feature of the shutter is not only the opening and closing, but also the complete seal in the closed state. This ensures that the shutter is completely closed and no dirt can get on the optics.
... and rough industrial surroundings
The shutter protects the optics from falling parts within a response time of 100 ms at an ambient temperature up to 60 °C.

Cooling Jacket Advanced
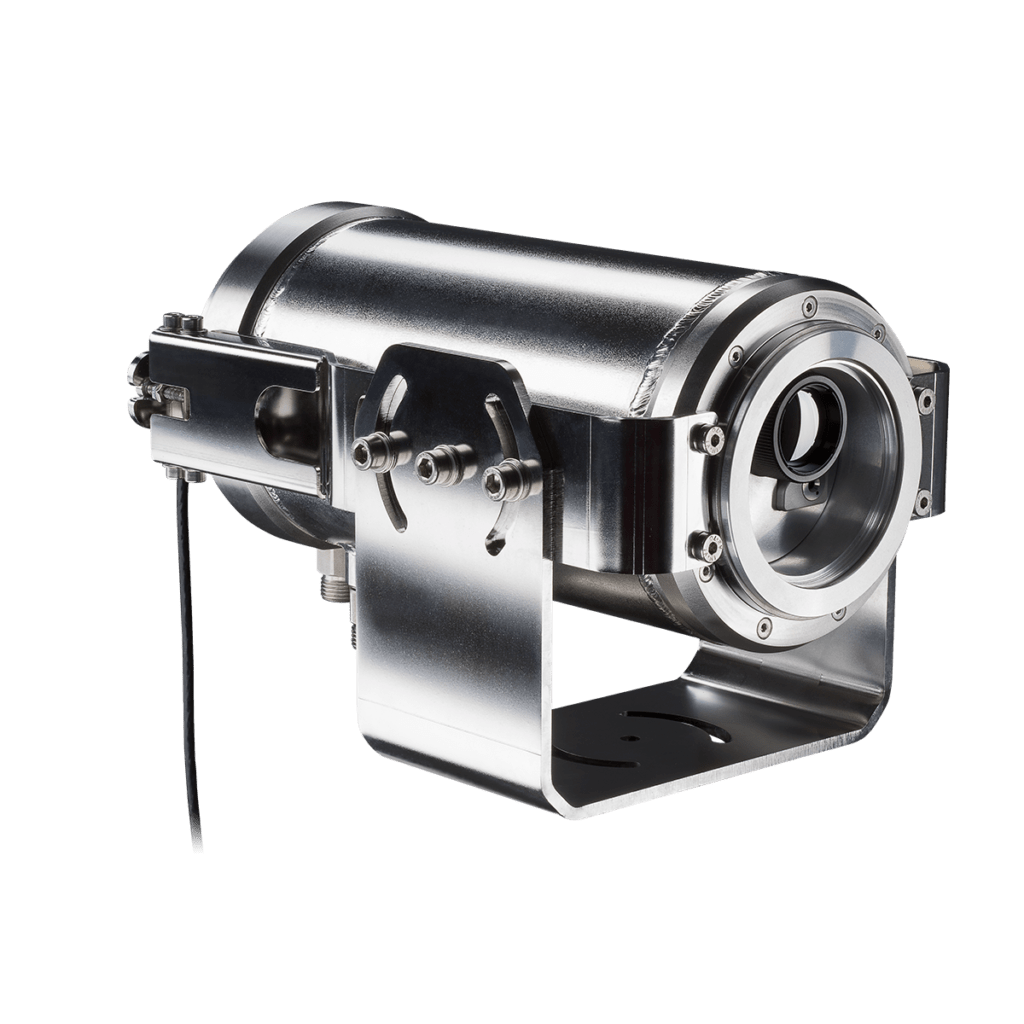
Universal water cooled housing for optris infrared thermometers and cameras under harsh industrial enviroments
The cooling housing CoolingJacket Advanced is intended to use for optris PI series as well as CTlaser and CSlaser for application at high ambient temperatures.
The cooling can be achieved by water (maximum ambient temperature: 315 °C). It also allows the integration of additional components like PI NetBox, USB Server Gigabit and Industrial Process Interface (PIF) in the extended version. Ethernet Cat. 6, USB- and sensor cables for ambient temperatures up to 250 °C as well as an optional cable cooling for up to 315 °C are available.
The shutter protects the optics from falling parts within a response time of 100 ms at an ambient temperature up to 60 °C.
Contact for Advice and Sales Worldwide
We offer comprehensive advice for your individual applications
Our experienced application engineers ensure competent and reliable customer service in the field. In addition, Optris works closely with numerous distribution partners worldwide.
USA and Canada
Optris Infrared Sensing LLC
Portsmouth, NH 03801 USA
Tel: +1 603 766-6060
E-Mail: sales@optris-ir.com
Internet: www.optris.com
Managing Director:
Paul Czerepuszko
